")
")
How it works
Prerequisites for the use of GARRbox.
The GARRbox personal synchronization and sharing service is based on IDEM identity federation. In order to use the service, your institution must be part of IDEM.
At this page you can check your organization’s membership in IDEM.
GARRbox also requires your institution to sign a special agreement. See the FAQ section for more details.
IDEM Access
GARRbox is a resource accessible through your own IDEM credentials, once your institution subscribes to the service.
To log in click on the Login item on the homepage. The following authentication form will appear.
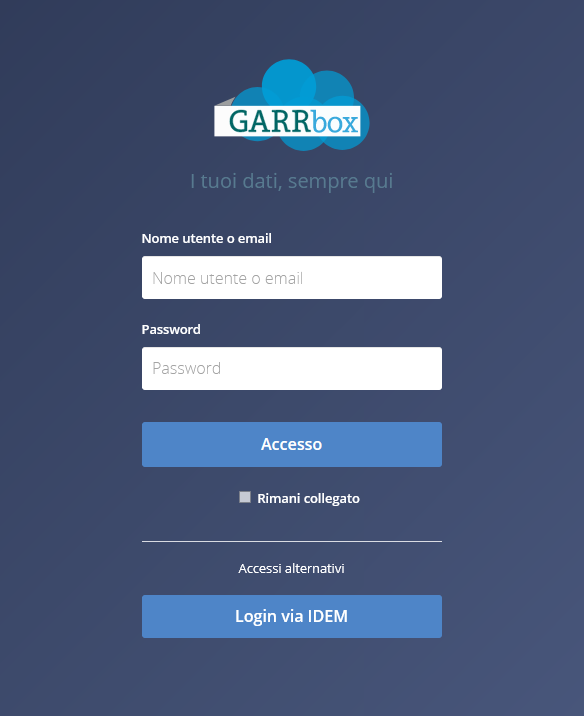
Click on Login via IDEM: here you can select your home institution and log in.

With your first login you will receive an email with your account authorization status. If your GARRbox Referrers agree to the activation, you will be ready to use the service in a few minutes.
Note
If you have a legacy user you can log in either through IDEM (recommended) or by entering Username and Password.
First login
With the first login done, it’s time to start synchronizing and sharing your files and folders with GARRbox.
The first step is to upload the data you wish to keep on GARRbox. There are several ways to do the upload: for an average number of files and not too large, the most immediate solution is to do drag’n drop of the data directly into the browser window.

In a completely equivalent way, it is possible to import data by clicking on the Menu marked with the “+” symbol that appears to the right of the name of the synchronization folder, by clicking on the “Upload” item. Some browsers prevent, for security reasons, the ability to load data with drag’n drop, the “+” button allows you to overcome this limitation.

Be careful with this mode of use, however. Browsers have functional and security limitations: it is impossible to easily load and manipulate nested data, such as those in folders and subfolders. In addition, in case of interrupted operations, the data will have to be loaded again.
To remedy these inevitable limitations related to the use of browsers, GARRbox provides its users with a synchronization client family for Desktops and mobile devices Thanks to the clients, all the limitations discussed are solved transparently, making the user experience much more convenient, secure and pleasant.
Specifically, GARRbox provides users with synchronization clients for desktop environments (Windows, MacOS X and Linux) and for Android and iOS mobile devices. These take charge of aligning local data with what is stored remotely by the service, taking care of maximizing the speed of data transfer, any retransmissions, and the fragmentation required to synchronize large amounts of data-with no limitations related to the number of files, the depth of the directory tree, and no size limits.
Desktop and mobile synchronization clients
You can download clients directly from the homepage, without even having to log in. GARRbox client
Client installation
Standard installation
Installation of the clients for Windows and macOS follows the standard procedures of the respective operating systems. Simply download the packages from the Client GARRbox section on the service Homepage and start their installation by double-clicking.

As for Linux platforms, the client is of the an AppImage bundle. It is a universal software format, which can be run on most Linux systems without installation. The only prerequisite is to make the file executable via the command:
chmod +x garrbox-2.10.1.7212.AppImage
Finally, by right-clicking on the executable select Run
Installation with AppImageLauncher
To make the AppImage more similar to an installed software and with the possibility of calling the application from the Linux launcher, you can use the AppImageLauncher tool. To install follow the official wiki in the section dedicated to your Linux distribution.
To download the GARRbox AppImage, right click on it and select Open with AppImageLauncher. In the window that appears, select Integrate and run. The GARRbox app has been integrated and can be open from the launcher.
Updating the client
With upgrading, it is possible for some operating systems to experience impromptu problems. To solve them you can apply the actions described in this section. Perform the update of the desktop synchronization application as described in the previous sections. When starting the updated client, during folder selection, conflicts may occur as in this image.

To solve this problem, follow the steps below:
Go to the folder where you want to synchronise
Enabling the display of hidden files
Delete (hidden) files that have the extension
*.db.Disable the display of hidden files
Retry synchronisation

Further information can be found in the official documentation.
How to login on clients
Generate security tokens
Before connecting clients to GARRbox, some simple steps related to the security of the service must be performed.
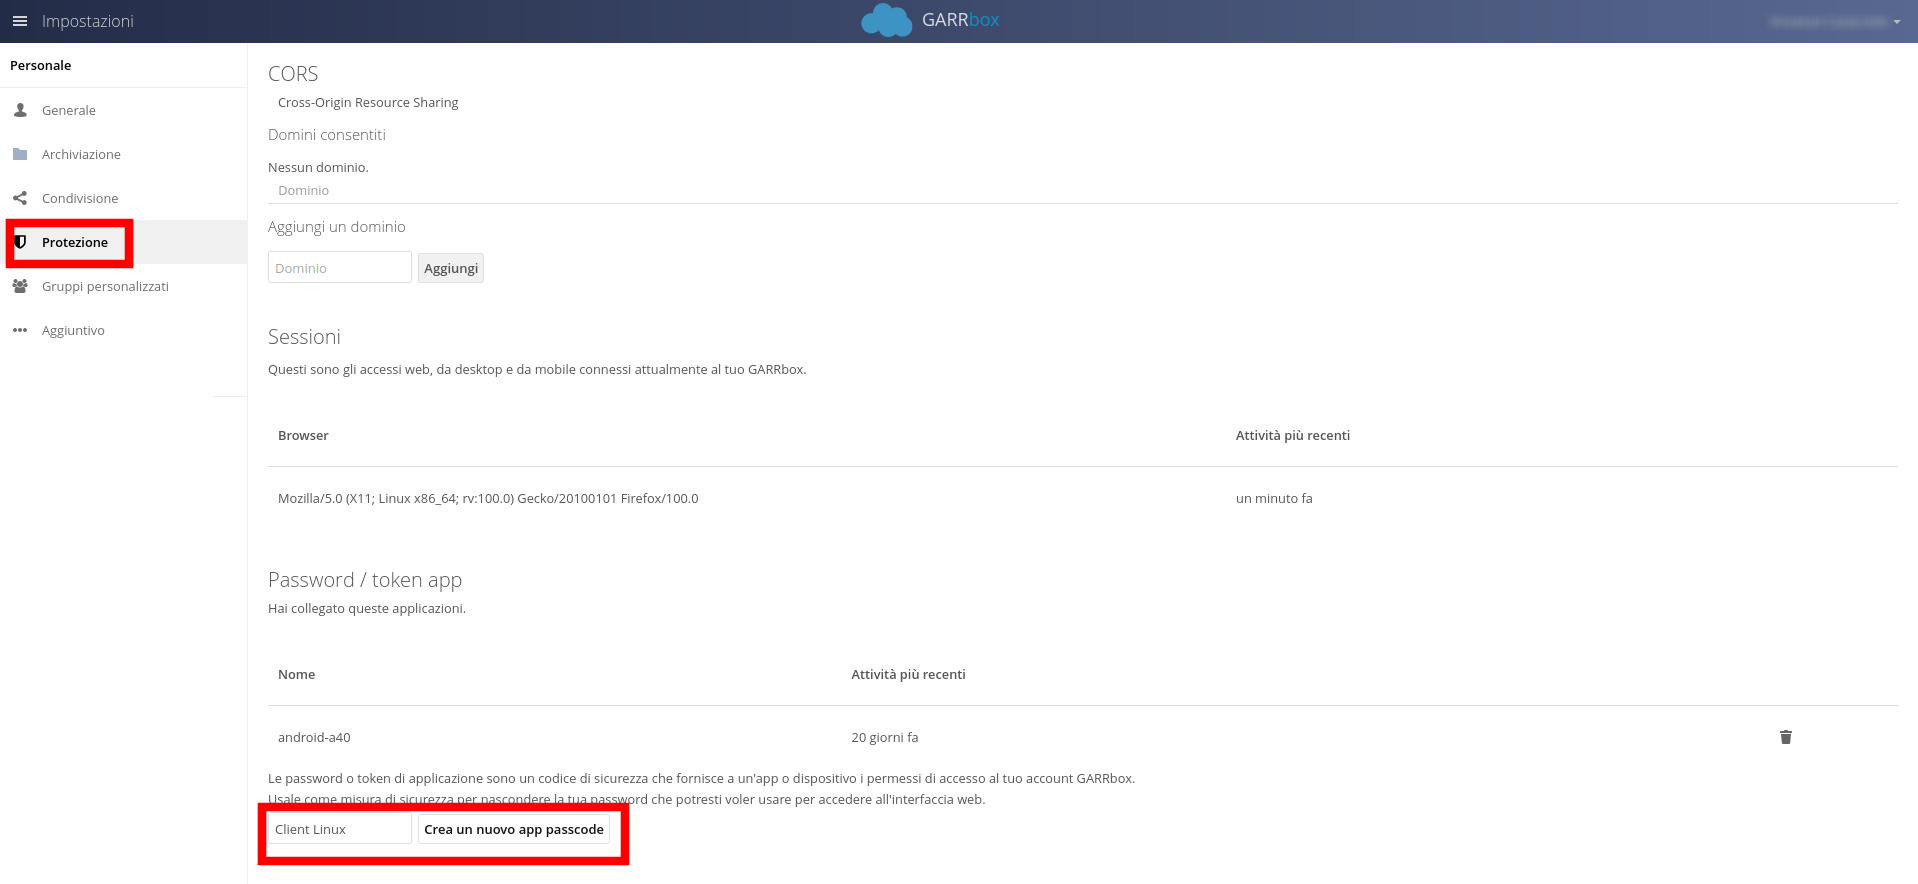
On all clients, both desktop and mobile devices of each platform, to log in you must first create an app token from the web interface. The steps to generate a token are the following:
Go to the context menu in the upper right and click on the “Protection” item
In the “Password / token app” section, assign a name to your token
Click on “Create new app passcode” and create a new app passcode.
A token will be provided that you will use to connect desktop and mobile clients to GARRbox.
Warning
The token will be shown just once. Take note of this, or you will have to redo the creation from scratch.
Take note of the Username and the token. These will be needed for client authentication, as described in detail in the following paragraphs.

Note
The generated tokens can be revoked at any time by clicking on the trash can icon.
Connecting clients
When opening the Desktop synchronization clients, or by clicking on “Add account” / “Add user” the screen with the GARRbox service address prompt will appear.
In the Server Address box specify
https://gbox.garr.it/garrbox
as shown in the following image

and click on Next.
Specify credentials
Enter the data provided by the web interface within the client and log in. In the Username field you will need to enter your IDEM ID including the domain.
<nome utente>@<dominio del vostro ente di appartenenza>
In the Password field paste the token string obtained as per the previous paragraph.

Click on Next
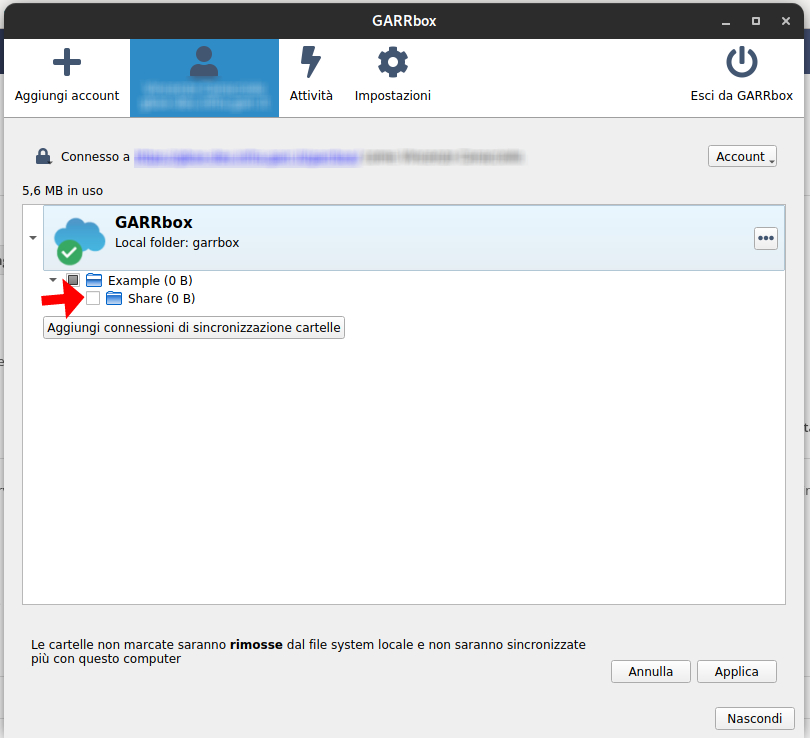
Select the synchronization options
In this screen you select the data synchronization options.

The supported synchronization modes are the following
Virtual Filesystem: data are not downloaded locally in advance, but are retrieved from the servers only at the time you access them. This mode optimizes local disk occupancy against increased connectivity usage. In addition, in the case of network absence some shared data may not be accessible.
Synchronize: this is the traditional operation of GARRbox, with the data always being stored locally and kept synchronized with the servers.
The third and final option of manual synchronization is aimed at experienced users. We do not recommend this option unless you have specific needs.
Syncronize mode allows you to activate a threshold on the automatic synchronization trigger for data that exceeds a certain threshold. By enabling this feature, if you receive data larger than the set threshold the client will ask you for confirmation to proceed before actually downloading the files.
Local Folder is the option to specify where GARRbox will save data locally. Usually, the default option is appropriate.
Click on Complete and you are up and running with GARRbox.
Command line interface
With GARRbox new clients, the legacy tools for terminal synchronization (garrboxcmd) are deprecated, we recommend their replacement with the more portable and effective RClone.
RClone is available at https://rclone.org/
Specific instructions for configuring RClone with GARRbox can be found at https://rclone.org/webdav/#owncloud
The connection via RClone involves the use of the WebDAV protocol to transfer data towards GARRbox.
Sharing data with other users
GARRbox allows you to share single files or entire folders between users registered to the service, but also allows you to share data with external users and with similar cloud services that support the Open Cloud Mesh protocol. Among these we can mention CERNbox, INFN-box, CNR-box, ENEA-box, SWITCH-Drive and SURF-Drive. The simplest sharing technique is that from a browser between users subscribed to the service. Click on the sharing icon of a file or folder, and type in the box the name of the person with whom you want to share the data.

The same result can be obtained from the Desktop synchronization clients by right clicking on the data you want to share and selecting the menu item “Share with GARRbox”. The menu option appears only for data organized in the base folder of the service, usually called / garrbox (or garrbox depending on the operating system). To share data with users who do not have access to the GARRbox platform, the “Create public link” option is available. Thanks to this function, it will be possible to access the data through any browser through the address created dynamically by the service.
The following image shows how to create a public link share, allowing even users who are not GARRbox members to receive and send data with you.

To provide greater access control, it is possible to protect linked shares by adding an access password to only data shared via public sharing, i.e., with users who are not GARRbox subscribers, while also specifying an expiration date for the link itself. Beyond the specified date, the link will no longer be valid.
If the object of the share with link is a folder, you can enable the edit option. By doing so, users who know the link of the share will be able to upload new content to the area.
Permissions on shares
Shares between GARRbox users allow fine control of access permissions. For each user or group participating in a share it is possible to select the operations allowed on the data, including the creation of new data in the location, modification of the data present, and their elimination. It is then possible to allow the re-sharing of data to third party users (also external to the system). Given the wide possibility of delegating control over the data of a share, the utmost attention is recommended in the choice of settings. A good rule is to grant the participants of a sharing the minimum necessary permissions, to avoid unwanted actions. When a new share is created, the service allows you to notify the recipient of the data with an email notification message.

Note
It is also useful to remember that subfolders on a share inherit visibility properties from the parent folder that contains them.
Monitor access to shared data
GARRbox offers different channels to keep track of the operations involving your data. From the browser you can control what happens to the data you share with others and to that shared with you. The Activities application, accessible from the context menu at the top left, has just this task.


The same information is visible from the Activities panel of the synchronization clients. The clients also report the status of data transfers to and from the GARRbox service.

Finally, you can receive automatic notifications of data actions. To activate notification messaging via email, access the Personal panel from the context menu at the top right. Go to the general menu and then in the General section set which notifications you want to track for each channel: flow of actions and email notification messages. Finally, choose how often you wish to receive emails.

Select the data to synchronize
GARRbox allows you to choose which files to keep remotely. In this way, for example, you can choose to limit the synchronization to only the data that you always prefer to keep with you or that you use most frequently, leaving the rest of the data as a remote backup.

Desktop synchronization clients also allow you to set an automatic download blocking threshold: data that exceeds the specified threshold needs your authorization before starting the transfer. In this way, in the case of sharing particularly large data, you will not run into the unpleasant problem of filling up the disk space inadvertently.

Limit network bandwidth consumption
GARRbox, like any other cloud service, is designed to be ubiquitous, so it takes into account the limits of cellular and domestic connections outside the GARR Network. In particular, the synchronization clients allow you to check the network band used. It is possible to adjust the data flow both in upload and download. The adjustment options are accessible from the “Network” panel of the clients.

Integrated OnlyOffice editor
GARRbox integrates the OnlyOffice application. This allows users to create and edit text documents, presentations and spreadsheets. The editor is also collaborative, thus allowing multiple users to edit a file simultaneously.
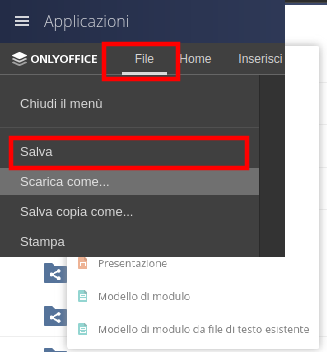
How the change occurs
During editing, the editor will continue to make saves but the actual saving to your personal storage will occur only when you close the editor. You can force saving to GARRbox by going to the Files menu and clicking Save.
DrawIO
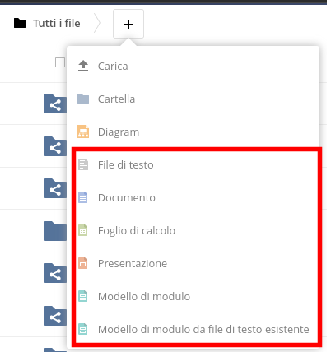
Another application integrated into GARRbox is DrawIO. This allows the creation and editing of diagrams. To create a new one click on the + button on your home page and select Diagram.

Where can I find more detailed documentation?
GARRbox integrates and extends the popular ownCloud open source tool. We suggest you consult the ownCloud user guides for more details on the individual features of the tool.
Technical Referrals - How do I manage my users’ quotas?
These features are available only to users granted the authoritative role of Entity Technical Contact in FLEX subscriptions.
To access quota management, select “Users” from the context menu in the upper right corner.

Locate the user whose quota you are going to edit. In the corresponding “Quota” column, open the drop-down menu and select a quota value to assign to the user: you can also specify arbitrary values in lexicographic format, for example, “10 GB” or “1500 MB.”

Technical Referrers - How do I authorize access to my users?
These features are available only to users granted the authoritative role of Entity Technical Contact in FLEX subscriptions.
Authorization policies are managed through the Primologin ancillary service, accessible at https://primologin-gbox.garr.it
Following the IDEM federated login, information about the aggregate resources assigned to one’s institution will appear. Immediately below is the list of users at your institution who have registered for GARRbox. By clicking on the “Activate” button in the “Actions on User” column you can authorize a new user to log in. The button is contextual and the choices offered depend on the user’s current status. The transitions are New -> Active -> Lock -> Activate/Delete. Each time the status changes, the system will send the user an email notification.

Below the table is a text area in which to define activation policies upon registration of a new user. In this way it is possible to automate the granting of access specified even complex constructs such as whitelists or regular expressions.
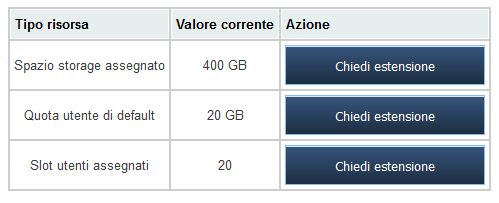
Technical Referrals - How do I request more aggregate resources for my institution?
These features are available only to users granted the authoritative role of Entity Technical Contact in FLEX subscriptions.
Authorization policies are managed through the Primologin ancillary service, accessible at https://primologin-gbox.garr.it
The System automatically sends an email message to the Entity Referrers when the aggregate resources, user license slots and storage space, are nearing exhaustion. To request an extension, simply click on the match button on the panel at the bottom of the Primologin page, as shown in the figure below.